Best Attic Insulation Options and Signs You Need Replacement
Attic insulation improves comfort and helps your HVAC run more efficiently by reducing heat transfer and blocking common air leaks. In this article, you will learn the signs of failing insulation, the best insulation options, and the correct order of work so your results last.
If your home feels uneven from room to room or your system runs longer than it should, insulation often sits near the root cause. Next, you will start with quick checks that prevent wasted work.
Attic Insulation Basics for Homeowners
Attic insulation slows heat transfer and helps your home maintain a steadier indoor temperature. It works best when installers place it evenly and stop air leaks before adding more material.
Insulation performance depends on coverage and condition, not just how much you have. When insulation settles, compresses, or leaves gaps, you can feel hot and cold spots and uneven room temperatures.
Signs Your Attic Insulation Is Failing
Failing attic insulation usually shows up as comfort issues that do not go away. You can often confirm the problem with a quick visual check for gaps, compression, moisture damage, or contamination.
Look for thin areas, bare spots, or insulation that looks flattened and matted. Also watch for dusty indoor air that returns fast, musty odors, or visible debris that suggests a bigger issue.
How to Check Your Attic Insulation Level
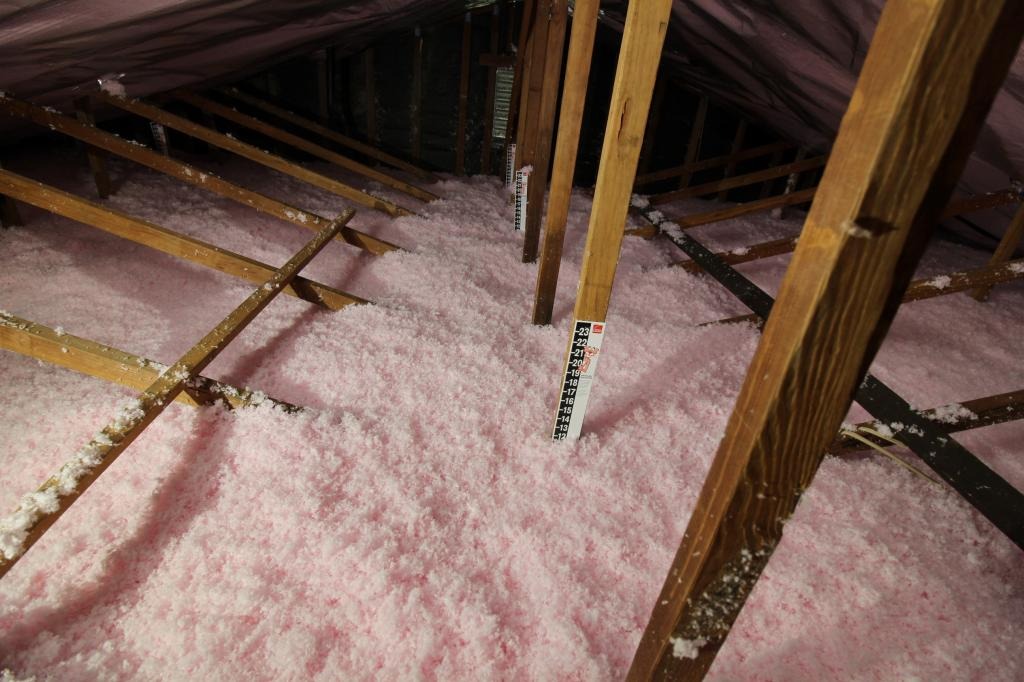
You can estimate attic insulation performance by checking depth and coverage consistency. You also need to check for air leaks because insulation does not stop moving air.
Use a flashlight and look across the attic floor for low spots and uneven coverage. Measure depth in a few areas that represent the whole attic, not just one easy corner.
Quick Attic Check That Takes Ten Minutes
This check helps you spot common insulation problems without guesswork. It focuses on coverage, compression, air leaks, and signs of moisture or pests.
| What you see | What it usually means | What to do next |
| Low depth and bare spots | Not enough coverage | Plan an insulation upgrade after air sealing |
| Uneven coverage and voids | Poor installation or settling | Level coverage, then add insulation |
| Compressed or dirty insulation | Reduced thermal performance | Inspect for moisture and consider replacement |
| Droppings or nesting signs | Contamination risk | Stop entry points and plan safe removal if needed |
| Dark staining near openings | Air leaks are pulling dust | Air seal first, then insulate |
After you finish this check, focus on air sealing next. Air leaks can make good insulation perform as if it is not there.
Attic Air Sealing Before Insulation
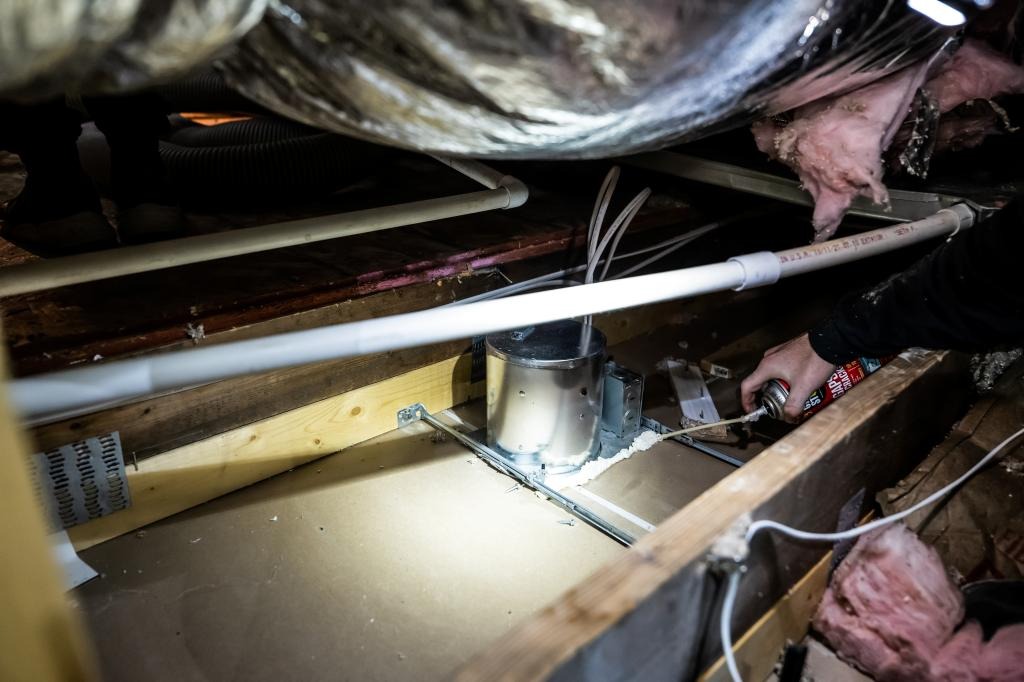
Air sealing improves insulation results because it stops conditioned air from leaking into the attic. Seal first so your insulation can do its job instead of trying to cover up airflow problems.
Target the common leak points around plumbing vents, wiring penetrations, and the attic hatch. Also, check gaps at top plates and around duct boots since air leakage there often drives comfort complaints and HVAC strain.
Quality Check That Matters
You should not see open gaps where air can move freely between the living space and attic. Once you seal those paths, you can add or replace insulation with more confidence.
Blown-in Attic Insulation and Fiberglass Batts
Blown-in insulation often works well in attics because it covers edges and irregular spaces more completely. Fiberglass batts can perform well when they fit snugly and installers avoid gaps and compression.
Blown-in fiberglass supports even coverage and works well for many open attic floors. Blown-in cellulose can also work well when installers control dust and maintain consistent depth.
Fiberglass batts can make sense in areas with standard framing where you can place each batt correctly. Installers must cut and fit batts carefully around obstructions because gaps reduce thermal performance.
Material Selection Based on Attic Conditions
Your attic conditions decide which insulation type will perform best long-term. Choose the option that allows even coverage across the attic floor while keeping key areas clear.
If your attic has lots of irregular areas and hard-to-reach corners, blown-in attic insulation often makes the most sense. If you have clean, open cavities that match batt sizes, batts can work when installed with care.
Next, decide whether you should add insulation or replace what you already have. That decision prevents wasted work and repeated problems.
When Attic Insulation Removal Makes Sense
Remove old insulation when it cannot perform safely or effectively. Removal also helps when old material blocks access to important air sealing locations.
Moisture-damaged insulation often loses performance and can contribute to odor and indoor air quality issues. Contaminated insulation from pests also creates a problem you should not ignore.
Insulation that looks heavily compressed, matted, or broken apart often cannot recover its R value. In those cases, replacement usually supports better long-term results than adding more on top.
Attic Insulation Replacement Steps That Prevent Repeat Problems
Replacement works best when you fix the cause before you install new insulation. Follow a clear order of work to avoid repeat contamination and comfort issues.
Start with an inspection that identifies air leaks, thin coverage areas, and any signs of moisture issues. Then complete attic air sealing so you do not trap problems under new material.
Address attic rodent proofing when you find entry points or evidence of activity. Complete attic decontamination when you find contamination, then install new insulation to a consistent depth with clean edges and full coverage.
Finish with a final check of the attic hatch seal and any penetrations you addressed. That final walkthrough protects your results and supports HVAC efficiency.
Rodent Damage and Insulation Performance
Rodents can damage insulation by nesting, compressing it, and contaminating it. You need to stop entry points before you install new insulation, so the problem does not return.
Look for droppings, nesting material, disturbed insulation paths, and odor in areas near penetrations and edges. Treat those signs as a signal to fix the access points and address contamination before you add material.
Common Mistakes That Reduce Insulation Performance
Most insulation failures come from missed air leaks and uneven coverage. Avoiding a few mistakes can protect comfort and thermal performance.
Do not add insulation over active moisture issues. Do not leave the attic hatch unsealed since that gap can undermine the rest of the work.
Installers should keep coverage consistent and avoid thin areas that create hot spots. They should also avoid compressing insulation since compression lowers the R value.
Next Steps With Your Attic Insulation
Attic insulation works best when air leaks are sealed, and any moisture or pest issues are handled before new material is added. A professional evaluation can help clarify whether adding insulation or full replacement will support better comfort and energy use.
For homeowners who prefer local guidance, Roberts Insulation Solutions is a Fountain Hills, AZ attic and crawl space specialist focusing on insulation, decontamination, and rodent proofing for residential properties. Understanding the full condition of the attic and crawl space can help prevent repeat problems after insulation work is completed.
Homeowners seeking more information about available services can review options for attic insulation in Fountain Hills or learn more about residential insulation in Fountain Hills to better understand next steps.